Do you have a spinning reel to catch trout? Who doesn’t love to have a grilled trout on their plates on a Saturday evening? Or perhaps a roasted piece would be equally savoring too, don’t you think? But then again, it could be quite tricky when you are up for deboning them. But fear no more, we are here to help you with tips and tricks on how to debone them, effortlessly.
Basically, there are so many ways that you can try seeing those YouTube videos or articles to debone your trout. But those are done by the chef or professionals, not by any noob. So there is a huge loophole that you can fall into if you start tying their oh-so-professional-techniques using those ultra-advanced cooking tools. You know, not everyone’s kitchen is filled with amazing (read expensive too) tools making life easy. Sigh!
But you must have a knife, don’t you? I’m not talking about those you use to cut fruits; because they are so blunt for cutting fish or meaty fillets. You need to have a Filleting Knife when you are deboning a trout for those finest precise cuts. However, if you want to cook the whole fish, then a butcher knife would do, but that’s not the case today. We are up for something good, something meaty yet fishy.
Now wear your cooking gloves and start by cutting the neck of the fish at the groove. Hold your knife at an angle towards the head, so that you can preserve as much fish fillet as possible. The filleting knife would give you more economical and neat cuts here.
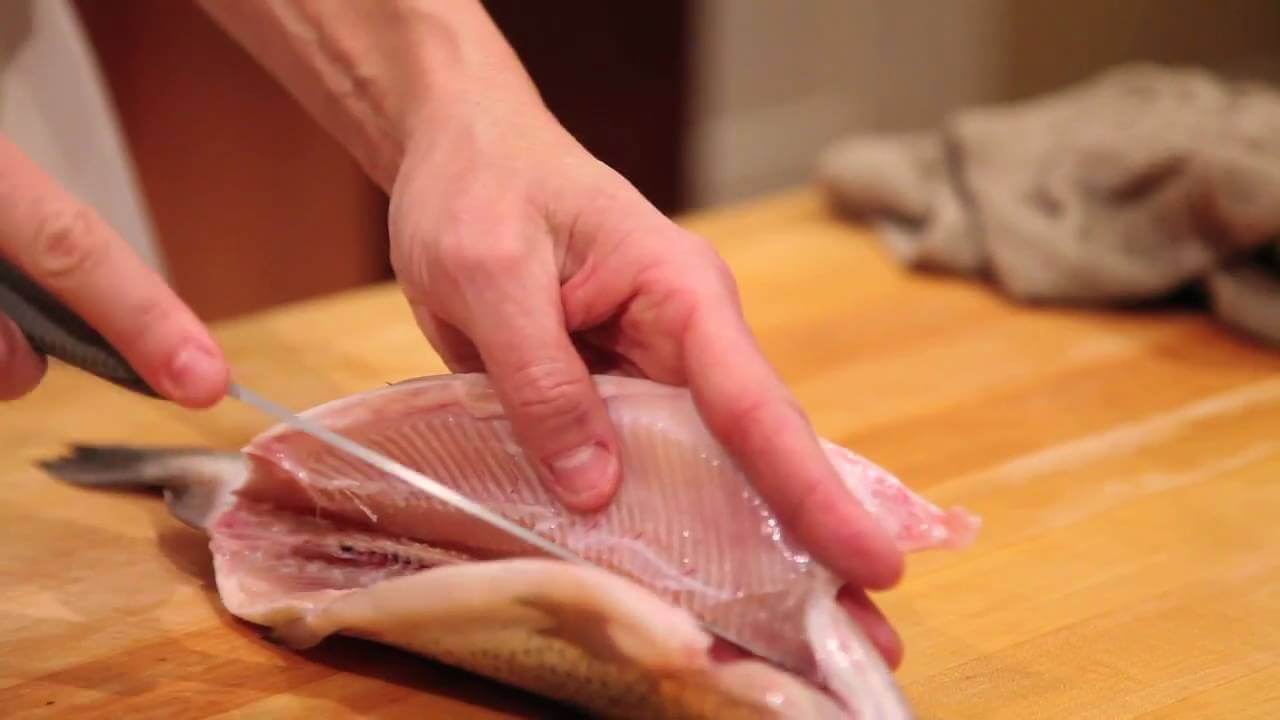
Once you have parted the head, the next step is to cut the fillet from the upper part of the middle bone. Place the fish horizontally in a way that its belly remains on the opposite side. Make a small cut now along the middle bone where you just removed the head. This will give you a hint where the bone is. Now pierce through the fillet towards the end of the fish (the middle bone will guide you to be just above the bone) using the knife. When you reached the tail finish the cut by slicing it away from the fish; you will now have one fresh deboned trout fillet.
Similarly to get the second fillet, flip the fish over. Repeat the procedures by starting from the head and slicing down smoothly over the middle bone, until you reach the tail. Cut this slice too to get the clean, meaty trout fillet.
The next step involves removing the pin bones. Place the fillet side up and skin side down. Start scraping the fillet with a knife and then pick on bones as you find. You can also flex the fillet to expose the bones that are lodged deep in it. Of course, you don’t want to get them in your neck when you are having a good night dinner with your loved ones. Removing the bones is a crucial step when you want to make a grill of it. But no worries, you don’t have to remove all the possible tiny bones out of the fillet – that would be way too time-consuming. And one or two tiny bones in the fish don’t hurt when you roast them well.
Once you got rid of the bones, the next task is to skin the fillet. Press the fillet with your left hand so that it doesn’t move and take hold of the filleting knife in your right hand. Place the knife along the bottom edge of the skin, and start slicing over the skin till the end while lightly tugging the skin in the opposite way. You would end up with a perfectly clean deboned, skinned trout fillet ready to get into your griller or oven.
Now the same procedures can be done by using a kitchen scissor as well. Scissor is essential when you are planning to serve the whole trout fish. If keeping the fish intact is your idea and if you want to surprise your family with a new dish, use both scissors and a filleting knife to get the clean and economical cut as you would want.
First, cut away the tail, scales, flaps, and fins of the trout using your scissors. Using the filleting knife, slice through below the head or through the upper area of the gills. This cut would help you to get through the belly so that you can debone the larger bone in the middle.
With slower motions, slice through the fish smoothly until you reach the end (or tail) of it. Now it’s time to divide the fish in a way that keeps one side intact and another side open to losing the bone.
Now, with a bit of pressure, release the middle bone and extract it from the flesh. When you reach the end as you are slowly extracting the bone, pull it apart from the tail. In this way, the ribcage will also come out along with the bone. But you have to be gentle while pulling, otherwise, it may cause tearing and the fish may fail to remain intact.
When you have removed both the ribcage and bones from the middle, you are now left with a fish with small pin bones. Scrap along the knife over the fish to find them, or simply flex or bend them to reveal those tiny bones, which you extract with hands.
And there you go; an intact trout with no bones in.
So yeah…as you have seen, deboning a trout is not a big deal when you have a good pair of scissors and knife. I suggest you buying any sharp filleting or boning knife to get the work done.
Plus, while you are making your fish, DON’T HURRY! I know it can be nerve-wracking while you are doing it for the first time. But pushing it or hurrying things will only lead you to a messy dish, a dish that you don’t want to see after all the hard work that you have put on to it.
So, be humble and have your patience with the fish. The result will be worth it!
Basically, there are so many ways that you can try seeing those YouTube videos or articles to debone your trout. But those are done by the chef or professionals, not by any noob. So there is a huge loophole that you can fall into if you start tying their oh-so-professional-techniques using those ultra-advanced cooking tools. You know, not everyone’s kitchen is filled with amazing (read expensive too) tools making life easy. Sigh!
But you must have a knife, don’t you? I’m not talking about those you use to cut fruits; because they are so blunt for cutting fish or meaty fillets. You need to have a Filleting Knife when you are deboning a trout for those finest precise cuts. However, if you want to cook the whole fish, then a butcher knife would do, but that’s not the case today. We are up for something good, something meaty yet fishy.
Now wear your cooking gloves and start by cutting the neck of the fish at the groove. Hold your knife at an angle towards the head, so that you can preserve as much fish fillet as possible. The filleting knife would give you more economical and neat cuts here.
Once you have parted the head, the next step is to cut the fillet from the upper part of the middle bone. Place the fish horizontally in a way that its belly remains on the opposite side. Make a small cut now along the middle bone where you just removed the head. This will give you a hint where the bone is. Now pierce through the fillet towards the end of the fish (the middle bone will guide you to be just above the bone) using the knife. When you reached the tail finish the cut by slicing it away from the fish; you will now have one fresh deboned trout fillet.
Similarly to get the second fillet, flip the fish over. Repeat the procedures by starting from the head and slicing down smoothly over the middle bone, until you reach the tail. Cut this slice too to get the clean, meaty trout fillet.
The next step involves removing the pin bones. Place the fillet side up and skin side down. Start scraping the fillet with a knife and then pick on bones as you find. You can also flex the fillet to expose the bones that are lodged deep in it. Of course, you don’t want to get them in your neck when you are having a good night dinner with your loved ones. Removing the bones is a crucial step when you want to make a grill of it. But no worries, you don’t have to remove all the possible tiny bones out of the fillet – that would be way too time-consuming. And one or two tiny bones in the fish don’t hurt when you roast them well.
Once you got rid of the bones, the next task is to skin the fillet. Press the fillet with your left hand so that it doesn’t move and take hold of the filleting knife in your right hand. Place the knife along the bottom edge of the skin, and start slicing over the skin till the end while lightly tugging the skin in the opposite way. You would end up with a perfectly clean deboned, skinned trout fillet ready to get into your griller or oven.
Now the same procedures can be done by using a kitchen scissor as well. Scissor is essential when you are planning to serve the whole trout fish. If keeping the fish intact is your idea and if you want to surprise your family with a new dish, use both scissors and a filleting knife to get the clean and economical cut as you would want.
First, cut away the tail, scales, flaps, and fins of the trout using your scissors. Using the filleting knife, slice through below the head or through the upper area of the gills. This cut would help you to get through the belly so that you can debone the larger bone in the middle.
With slower motions, slice through the fish smoothly until you reach the end (or tail) of it. Now it’s time to divide the fish in a way that keeps one side intact and another side open to losing the bone.
Now, with a bit of pressure, release the middle bone and extract it from the flesh. When you reach the end as you are slowly extracting the bone, pull it apart from the tail. In this way, the ribcage will also come out along with the bone. But you have to be gentle while pulling, otherwise, it may cause tearing and the fish may fail to remain intact.
When you have removed both the ribcage and bones from the middle, you are now left with a fish with small pin bones. Scrap along the knife over the fish to find them, or simply flex or bend them to reveal those tiny bones, which you extract with hands.
And there you go; an intact trout with no bones in.
So yeah…as you have seen, deboning a trout is not a big deal when you have a good pair of scissors and knife. I suggest you buying any sharp filleting or boning knife to get the work done.
Plus, while you are making your fish, DON’T HURRY! I know it can be nerve-wracking while you are doing it for the first time. But pushing it or hurrying things will only lead you to a messy dish, a dish that you don’t want to see after all the hard work that you have put on to it.
So, be humble and have your patience with the fish. The result will be worth it!